Wednesday, May 23, 2012
Tuesday, August 16, 2011
SQL Server Reporting Services 2005/2008 - Error(s)
Monday, December 13, 2010
SQL Server Fix : Error : 40 – could not open a connection to SQL server.
Fix/Workaround/Solution:
 Step 1) Make sure SQL SERVER is up in services and the instance you try to connect is running.
Step 2) Your system Firewall should not block SQL Server port.
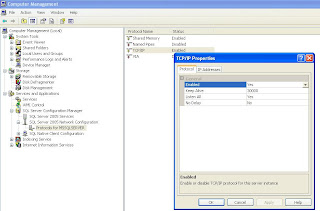
Step 3) Go to administrative tools >> Computer Management >> Services and Applications >> SQL Server 2005 Network Configuration >> Enable TCP/IP protocol. Make sure that SQL SERVER port is by Default 1433.
Step4)Now follow this KB Article of MSDN depending on your server :http://support.microsoft.com/default.aspx?scid=kb;EN-US;914277
Tuesday, December 7, 2010
Oracle : Show all Tables available in Oracle Database
select owner, table_name from all_tables;
(OR)
select table_name from all_all_tables;
Sunday, December 5, 2010
SQL Server 2005 Mixed Authentication Enabling
Goto MS SQL Server Management Studio ->Connect Database -> Right click on Server Name choose Properties -> In the Server Properties screen ->Under Security Tab on left side -> select Radio Button SQL Server and Windows Authentication(Mixed Mode) -> Just Say OK. Like the below Screenshot. This allows to go for any of two authentications. 1)Windows Authentication. 2)SQL Server Authentication.

Friday, August 20, 2010
How to Check Oracle Service Names?

This may Usefull for connectivity of SAP Business Objects Data Connectivity (Integration) and many of the times when connectivity for BODI Repositories & Database Connections.
The TNSNAMES.ORA file is where you define your SERVICES. This file usually resides in the $ORACLE_HOME/NETWORK/ADMIN directory.
So We can create our cust defined TNS Service Names based on requirement. Each one holds PORT = 1521

Wednesday, April 15, 2009
Export SQL Server data to an Excel file using SSIS and Visual Studio
This chapter, excerpted from the book "Beginners Guide to SQL Server Integration Services Using Visual Studio 2005" by Jayaram Krishnaswamy, shows you how to create an SSIS package to transfer data from a table in a SQL Server 2005 database to a Microsoft Excel spreadsheet.
You will also learn how to use a Character Map Data Transformation. In the hands-on exercise, you will be transferring data retrieved from a SQL 2005 table to MS Excel 2003 spreadsheet file. You will be using a Data Flow Task consisting of a source connected to a SQL 2005 Server-based connection manager, and an Excel Destination connected to an Excel connection manager.
In order to follow these steps, you will need a source and a destination: the source data is extracted from the MyNorthwind database
| | ||
 Click below to listen to a podcast of author Jayaram Krishnaswamy discussing the process of transferring SQL Server data to a Microsoft Excel spreadsheet file, and why he chose to include this chapter in his book. (Time: 8:57)

![]() TRANSFER SQL SERVER DATA TO EXCEL FILE
TRANSFER SQL SERVER DATA TO EXCEL FILE![]()
![]() Step 1: Create a SQL Server BI project and add a Data Flow Task
Step 1: Create a SQL Server BI project and add a Data Flow Task![]() Step 2: Configure the DataReader's Connection Manager
Step 2: Configure the DataReader's Connection Manager![]() Step 3: Set up the DataReader Source for SQL Server data
Step 3: Set up the DataReader Source for SQL Server data![]() Step 4: Install a Character Map for SQL Server data transformation
Step 4: Install a Character Map for SQL Server data transformation![]() Step 5: Add an Excel destination and create path to Character Map
Step 5: Add an Excel destination and create path to Character Map![]() Step 6: Configure the Microsoft Excel Destination component
Step 6: Configure the Microsoft Excel Destination component![]() Step 7: Test data transfer from SQL Server table to Excel Spreadsheet
Step 7: Test data transfer from SQL Server table to Excel Spreadsheet
Step 1: Create a SQL Server BI project and add a Data Flow Task
In this section, you will be creating a Business Intelligence project and changing the name of the default package object. Since it is data-related, you will be adding a Data Flow Task. You will also be adding a DataReader component to the data flow.
- Create a business intelligence project Ch 5 as described in Chapter 2 or Chapter 3.
- Change the default name of package from Package.dtsx to TableToXls.dtsx.
- Drag and drop a Data Flow Task from the Toolbox onto the Control Flow page.
- Click open the Data Flow tab, which displays the Data Flow page.
Now, you will be able to access the Data Flow Items of the Toolbox consisting of Data Flow Sources, Data Flow Destinations, and Data Flow Transformations (refer to Chapter 1).
- Drag and drop a DataReader Source from the Data Flow Sources group onto the Data Flow page.
Step 2: Configure the DataReader's Connection Manager
Configuring the DataReader source that connects to the local SQL Server 2005 has been described in earlier chapters. Here, only a couple of the images relevant to this chapter will be shown.
- Right-click inside the Connection Managers page below the Canvas, and from the drop-down choose New ADO.Net Connection….
If you are continuing with this chapter after Chapter 4, you will see the Configure ADO.NET Connection Manager screen displaying the previously configured connection manager. If you need to create a new one, follow the steps shown in the previous chapter.
- Click on the OK button in the Configure ADO.NET Connection Manager window.
A connection manager, Localhost.MyNorthwind.sa, will be added to the Connection Manager's page.
Step 3: Set up the DataReader Source for SQL Server data
- Right-click the DataReader Source, in the drop-down menu.
- Choose the Edit… menu item in the drop-down menu.
This opens the Advanced Editor for DataReader Source. At first, you need to indicate a connection manager that the DataReader can use.
- In the Advanced Editor for DataReader Source that gets displayed click on the Connection Managers tab.
- Click on an empty area (in grey) below the list heading, Connection Manager.
Here, you will see the connection manager that you added in step 1.
- Choose this Connection Manager.
- Next, click on the Component Properties tab to open the properties of the DataReader component.
Here, you will notice that this requires an SQLCommand (the only empty field now).
- Click on the ellipsis button along its side to display a text editor where you can type in your SQLCommand.
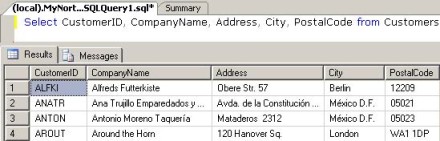
You may also directly type-in the SQL Command:
SELECT CustomerID, CompanyName, Address, City, PostalCodeFROM Customers - Click on the Refresh button.
This query will allow the DataReader to read the data from the five columns. A sample of the table data is shown in the following screenshot, taken from SQL Server 2005 Management Studio. If you recall, these were the same columns that were used in the previous chapter as well.
- Click on the Column Mappings tab.
This will open the Column Mappings page showing the columns that are the output of the DataReader.
In the last tab on this editor, Input and Output properties, you can add/ remove items from the External Columns, the Output Columns and the DataReader Error output. For this tutorial, no modifications are made.
- Click on the OK button in the above window.
This completes the configuration of the DataReader which brings five columns from the SQL 2005 Server.
Step 4: Install a Character Map for SQL Server data transformation
The Character Map transformation is described in Chapter 1, but here you will be experimenting with this transformation. The transformation manipulates the text string that is coming to it and outputs the manipulated string. For example, in the screenshot we have just seen above, the CompanyName has mixed case. Using this transformation, we will capitalize all the characters that appear in the CompanyName column before it is written to an Excel File—Alfreds Futterkiste will become ALFREDS FUTTERKISTE, etc.
- Drag and drop a Character Map data flow item from the Data Flow Transformations Group in the Toolbox onto the Data Flow page of the Canvas.
- Right-click on the DataReader Source and from the drop-down click on the Add Path menu item.Publish Post
- From the displayed window, Data Flow, choose Character Map for the To: field as shown